Progressive Summarization
Progressive summarization balances compression with maintaining context. The basic idea is to create a document that is short, searchable, and if I pick it up a couple of years from today, it will hold enough context to remind me of the key points I've learned from reading that book. It is the process of taking a book and creating a mini-summary or book-on-a-page sketch in such a way, that each step of the compression process is simple to execute and can be accomplished in a relatively short amount of time, spread across time, in the course of other work, and only doing as much or as little as the information deserves.
Tiago defines 5 layers of summarization, each layer simple to implement, and requiring limited effort. By building the layers one on top of the other, the end result is a powerful compression of the text. The beauty of the approach is that it maintains context throughout the process allowing for later drill down into my literature notes or even the book if required.
Layer 0 - Original Full-Text Book
Layer 1 - Literature Notes
I read on a Kindle. My layer 1 notes are text highlights and occasional personal notes next to the highlights. I found Tiago's best practice advice, to highlight every chapter title, very helpful as this way the resulting Kindle clippings maintain the original structure of the book. This provides context later when processing the clippings in Obsidian. I am very liberal in deciding what I highlight. I typically end up with roughly 5-10% of the book highlighted.
Once finished with the book I download the "My Clippings.txt" file from my Kindle, rename it to "My Clippings.md" and drop it into Obsidian. I then use a simple Templater script to convert the clippings file to markdown literature notes. You can find my script here.
<%*
const editor = this.app.workspace.activeLeaf?.view?.editor;
if(!editor) return;

const linecount = editor.lineCount();
let titles = [];
for(i=0;i<linecount;i++) {
  if(i%5==0) {
    const line = editor.getLine(i);
	if(!titles.includes(line)) {
	  titles.push(line);
	}
  }
}

const title = await tp.system.suggester(titles, titles,false,"Select book from list");

let output = [];
let page = 0;
let includeLine = false;
let isNote = false;
for(i=0;i<linecount;i++) {
  const line = editor.getLine(i);
  if(i%5 == 0) {
    includeLine = line == title;
  }
  if (includeLine && i%5 == 1) {
    const p = line.match(/(\d+)/);
	if(p && page!=p[0]) {
	  page = p[0];
	  output.push("#### "+page);
	}
	isNote = line.startsWith("- Your Note");
  }
  if (includeLine && i%5 == 3 && line !="" && line !="\n") {
      output.push((isNote ? "" : "> ") + line);
  }
}

window.navigator.clipboard.writeText("# "+title+"\n\n"+output.join("\n\n")+"\n\n");

new Notice ("Extracted kindle highlights are available on the clipboard.",4000);
%>
Layer 2 - Highlighted Notes
Once I have imported my Layer 1 notes into Obsidian, I read through the notes and mark chapter headings (#, ##, etc.). During this first readthrough, I also ==highlight== (CTRL+H) parts of my notes that I find more important. I don't spend too much time deciding what to highlight, I just follow my heart. If inspired by the text I add quick sketches as well. I have another Templater script to help add sketches with the least friction possible. You can find my Templater script here.
<%*
  const folder = tp.file.folder(true) == "/" ? "/" : tp.file.folder(true) + "/";
  let title = await tp.system.prompt("Title?");
  if(title == "") return;
  title = tp.file.title + " - " + title ;
  tR += "!["+"["+folder+title+".excalidraw]]\n"; //the .excalidraw extension is automatically added by EA.create

  const ea = ExcalidrawAutomate;
  ea.reset();
  ea.create({
    filename:title,
	foldername:folder,
	templatePath: "Excalidraw/template.excalidraw",
	onNewPane: true
  });
%>
Layer 3 - Bold Highlights
During my second pass through the literature notes, I focus my attention on the highlighted text and mark with bold the keywords or fragments that I find particularly important. I also refine my sketches or add new ones.
Layer 4 - Mini-Summary
I use a third Templater script to extract the highlighted text and the sketches from my literature notes to create a rough draft summary document. I work myself through this text making edits, sometimes shifting text around to finalize my book summary. You can find my Templater script here, and my finalized mini-summary for Storyworthy here. The picture below illustrates how the first draft summary looks like.
<%*
//check if an editor is the active view
const editor = this.app.workspace.activeLeaf?.view?.editor;
if(!editor) return;

const separator = " ... ";

function getHighlight (i) {
  const line = editor.getLine(i);
  const match = line.matchAll(/==(.*?)==/g);
  const heading = line.match(/^(#+)\s/);
  const sketch = line.match(/^(!\[\[.*?]])/);
  let result = null;
  while(!(highlight = match.next()).done) {
    result = result ? result + separator + highlight.value[1] : highlight.value[1];
  }
  if(result) return (heading ? heading[0]:"") + result;
  if(sketch) return sketch[0];
  return null;
}

let output = [];

const linecount = editor.lineCount();
for(i=0;i<linecount;i++) {
  const highlight = getHighlight(i);
  if(highlight) output.push(highlight);
}

window.navigator.clipboard.writeText(output.join("\n\n"));

new Notice("Extracted highlights are available on the clipboard.",4000);
%>
Layer 5 - Book on a Page
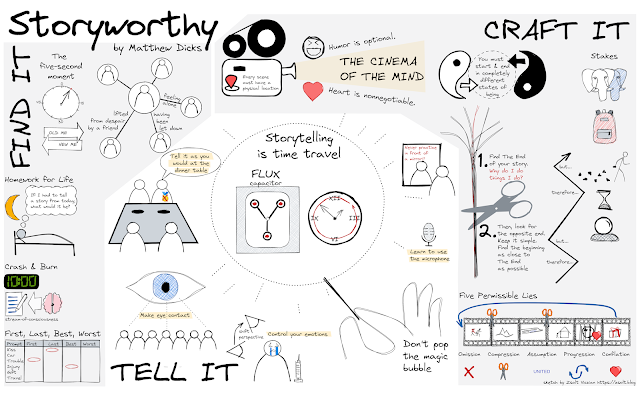
This is the final step in the process. I can't say I have much experience with this since I have only created a single Book on a Page summary until now. I read through my mini-summary and looked at my sketches. I copied all the sketches to a single Excalidraw page and played with organizing them, removing unnecessary text and drawings until I felt satisfied with the result.


Comments
Post a Comment